Published online Jun 21, 2010. doi: 10.3748/wjg.v16.i23.2851
Revised: January 25, 2010
Accepted: February 1, 2010
Published online: June 21, 2010
For an electron microscopic study of the liver, expertise and complicated, time-consuming processing of hepatic tissues and cells is needed. The interpretation of electron microscopy (EM) images requires knowledge of the liver fine structure and experience with the numerous artifacts in fixation, embedding, sectioning, contrast staining and microscopic imaging. Hence, the aim of this paper is to present a detailed summary of different methods for the preparation of hepatic cells and tissue, for the purpose of preserving long-standing expertise and to encourage new investigators and clinicians to include EM studies of liver cells and tissue in their projects.
- Citation: Wisse E, Braet F, Duimel H, Vreuls C, Koek G, Olde Damink SW, van den Broek MA, De Geest B, Dejong CH, Tateno C, Frederik P. Fixation methods for electron microscopy of human and other liver. World J Gastroenterol 2010; 16(23): 2851-2866
- URL: https://www.wjgnet.com/1007-9327/full/v16/i23/2851.htm
- DOI: https://dx.doi.org/10.3748/wjg.v16.i23.2851
For an electron microscopic study of the liver, expertise and complicated, time-consuming processing of hepatic cells and tissues is needed. The interpretation of electron microscopy (EM) images requires knowledge of the liver fine structure and experience with the numerous artifacts in fixation, embedding, sectioning, contrast staining and microscopic imaging. In addition, the considerable investment in equipment and the costs of personnel, together with the construction and maintenance of dedicated laboratory space and accessory equipment, makes EM investigation of cells and tissues one of the most cost-intensive approaches in biomedical research. The choice of the right preparation method and the use of good criteria to evaluate the quality of the preparation, together with the right interpretation of the results, is crucial not only for getting the best out of the method, but also to avoid misuse of tax payers money. With sadness, we conclude that the old trade of traditional EM studies is disappearing, and is being partly replaced by immunological techniques and confocal or fluorescence microscopy[1,2]. Hence, the aim of this special paper is to present a detailed summary of different methods for the preparation of hepatic cells and tissue, for the sake of preserving long-standing expertise and to encourage new investigators and clinicians to include EM studies of liver cells and tissue in their projects. In a recent review and guidelines on the clinical use of liver needle biopsies by Rockey et al[3], it is stated that, at present, there is only a minor or even negligible role for the use of EM in the diagnosis, prognosis and management of patients with liver disease.
Fixation has several goals: (1) to stop metabolism; (2) to fix structures of organelles and molecules in their current position; and (3) to make material accessible and stable during further processing. When metabolic activity in tissues is not arrested, autolytic changes will develop within minutes or even seconds. The need to use extremely fresh tissue, preferably without touching and deformation is therefore of utmost importance. The fixation is also responsible for crosslinking and arresting many molecules with the result that cells, organelles and their substructures are preserved. After embedding, sectioning and contrast staining, these structures become visualized in the electron microscope at magnifications in the range of 50 to 1 000 000 times. The protocols given hereafter can be used for light microscopy, scanning electron microscopy (SEM) and transmission electron microscopy (TEM).
In a situation where experimental animals are used, the method of perfusing a fixative through the portal vein is by far the best method to choose[4-7]. When a complete liver is not available, injecting the fixative into a piece of tissue not smaller than 1 cm provides comparable results to portal vein perfusion. This method can be applied to experimental or clinical wedge biopsies[8-13]. An advantage of this method is the fact that it only requires a small opening of the peritoneal wall to collect a small piece of tissue. With regard to needle biopsies, there have been attempts to inject the fixative into the tissue of the biopsy, with quite good results[8,10,12,14-16]. Unfortunately, these attempts have not resulted in routine applications and immersion fixation remained the standard method of fixing liver needle biopsy specimens. Vascular perfusion through a partly resected liver not used for transplantation, has also been reported to be successful[17]. In order to complete the series of protocols, we have added a short description of fixation of liver cell cultures.
Important elements in fixation are the chemical composition of fluids and the physical conditions during their application. Fluids involved in the fixation process should be isotonic to the cells; in other words, the fixation fluid should be as physiological as possible, with the exception of the fixing compound[18]. To avoid temperature shock of cells and tissues before the actual fixation sets in, isothermic fluids should be used in principle. The major condition for fixation is to transfer cells and tissues from their natural environment to the fixing environment, as rapidly as possible: this should take not more than a few seconds, be it in the operating room or in the laboratory. Living cells and tissues should not be left alone, not even for a few seconds, when this can be avoided. One should avoid subjecting the cells or tissue to drying or dry conditions, keep them wet and well-immersed in fluid, and watch the meniscus carefully to ensure that it does not touch the cells, because it will destroy them.
Fixation should be applied at the cellular level, i.e. bring all cells instantaneously and simultaneously into contact with the fixative. Immersion fixation of small pieces of tissue by plunging them into a fixative has to be avoided as much as possible. The slow penetration of a fixative into a 1-mm piece of tissue results in bad fixation in the center of the block. During the penetration of the fixative, its constituents react differently with cellular components, thereby changing the composition of the fixative on its way to the center of the block. The vehicle (buffer) is supposed to penetrate more rapidly, at the same time slowing down the fixing compound. Immersion fixation might leave the center of a tissue block unfixed for the major part of an hour. Nevertheless, immersion-fixed liver biopsies might provide sufficient information on the ultrastructure of parenchymal cells, but unfortunately sinusoids and sinusoidal cells are destroyed by immersion fixation.
Perfusion protocols allow a regimen of different fluids to be flushed through the liver[18]. Since osmium is an expensive and very toxic substance, it is not recommended to apply this fixative by perfusion. We have tried osmium perfusion[4], but the results were poor[18]. For post-fixation, the tissue should be cut into pieces that are washed in buffer to avoid chemical reactions between glutaraldehyde and osmium. The tissue blocks are subsequently immersed in the buffered osmium tetroxide. By doing so, one has control over a toxic procedure, while there is free admission of osmium to the cells through open veins and sinusoids, and the rapid application of a second fixative with a different reaction mechanism[19]. Although ethanol is used to dehydrate the tissue, its capacity to precipitate proteins and harden the tissue contributes to the fixation process. In order to better preserve membranes and their contrast, several additives to the fixatives have been proposed and applied, such as Ca2+ or Li+ ions, ferrocyanide[20], tannic acid, and picric acid[19,21].
Cryotechniques, molecular identification of cellular components, and their three-dimensional reconstruction or cryofracture as an alternative method to chemical fixation are not the subject of this review.
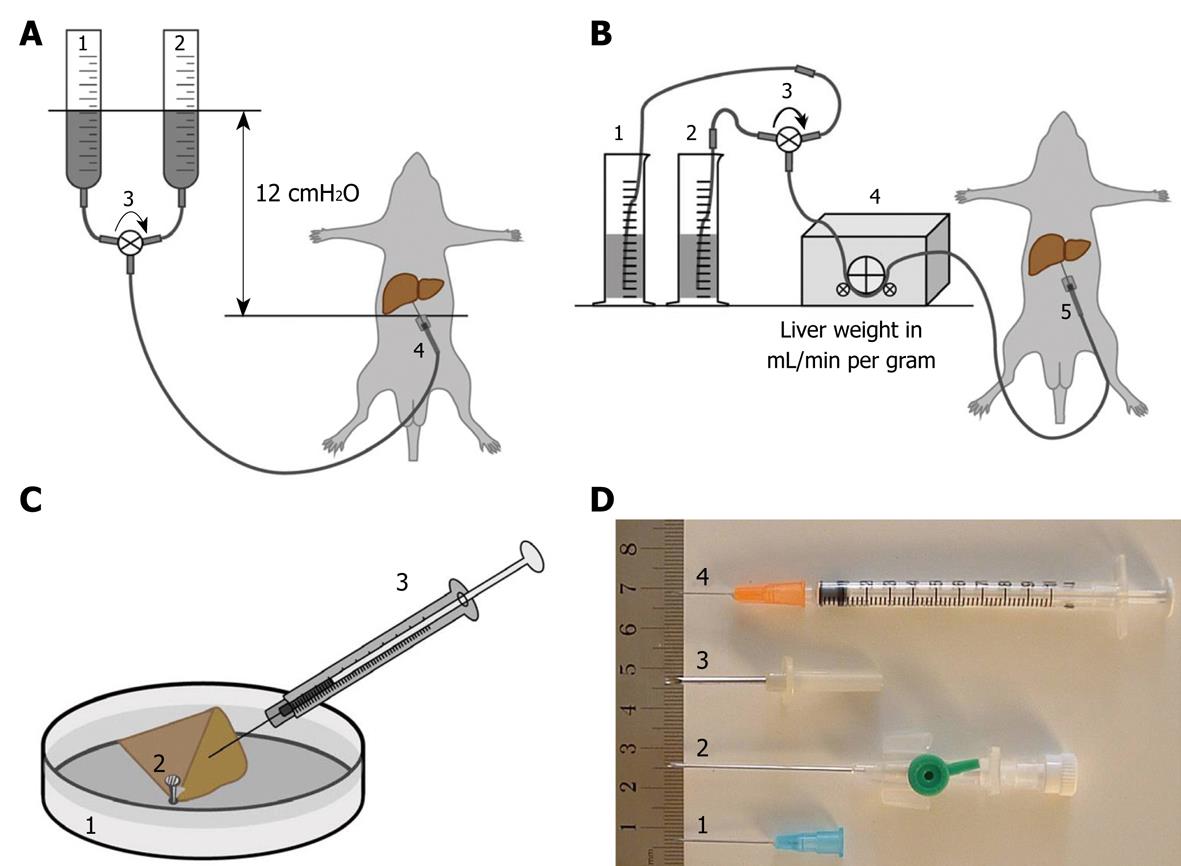
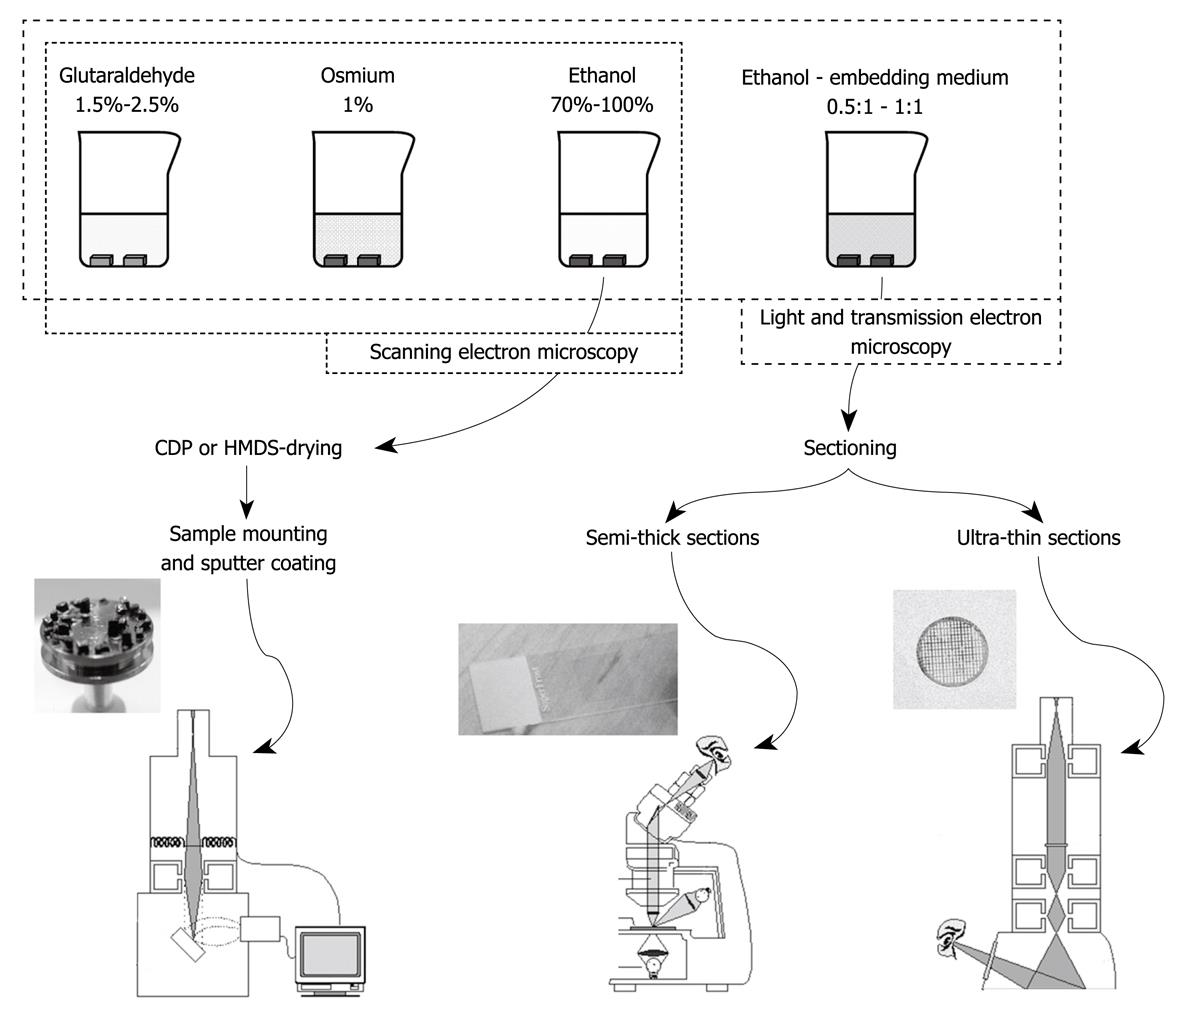
The procedure for perfusion fixation of total liver in situ is as follows: (1) Anesthetize the animal, preferably with 4.5 mg/100 g body weight Nembutal (which also relaxes the musculature); (2) Fix the animal to a waterproof surgical support with its back down; (3) Shave and disinfect the animal’s abdomen; (4) Open the abdominal cavity along the linea alba, with lateral cuts along the ribs and lower segment; (5) Gently move the intestines aside and cover them with surgical cotton or bandages wetted with warm physiological saline to keep them moist and warm (one could also use an infrared lamp); (6) Expose the portal vein and prepare separate, double ligatures around it; (7) Take care that the hepatic artery is included in the ligature; (8) Introduce the largest possible (just fitting) needle into the portal vein, after connecting it to a silicon tube that is connected to the perfusion system (fluids on room temperature, glass vessels or peristaltic pump, Figure 1A and B); (9) Constrict the ligatures independently, taking care not to puncture the portal vein, and make sure to close to the hepatic artery; (10) Start perfusion with glutaraldehyde solution by opening a valve or switching on the peristaltic pump; the flow rate in mL/min should be more or less equal the total weight of the liver in grams; (11) Incise the vena cava to allow fluids to escape from the vascular system, and aspirate fluids when necessary; (12) Watch the liver change in color and consistency. This process should start within the first minute (typically 15-30 s); (13) Stop the perfusion after 5 min; (14) Gently remove the liver or one or two well-perfused lobes and put them into a Petri dish that contains fixative. Well-perfused liver lobes change their color from dark red to yellow/brown, whereas the consistency changes from soft to hard like a boiled egg. Badly perfused parts of the liver that are entirely or partly soft and still dark red-brown in color should not be processed. Note that some lobes, e.g. the caudate lobe, often show better perfusion than other ones; (15) Clean a razor blade with ethanol and paper tissue (to remove protecting grease) and gently cut 1-mm slices of liver tissue. Do not put any pressure on the tissue while cutting, and make sawing movements with the razor blade; (16) Keep tissue slices covered with glutaraldehyde and cut multiple 1 mm × 1 mm strips under fluid; (17) Cut several strips simultaneously into 1 mm × 1 mm × 1 mm blocks for TEM, or 1 mm × 1 mm × 5 mm strips for SEM and/or 5 mm × 5 mm × 1 mm slices for light microscopy (LM) flat embedding; (18) Total time in glutaraldehyde should not be longer than 20 min; (19) Transfer blocks to washing buffer (which is the buffer of the glutaraldehyde fixative) to remove glutaraldehyde before contact with osmium; (20) Transfer blocks to 1% buffered osmium in small glass vessels and close these with a cap; (21) Postfix for 1 h in osmium, keep the small vessels at 4°C, and shake the fluid gently and regularly; (22) Transfer the tissue blocks to the second washing buffer (osmium-vehicle buffer), and wash once or twice to remove osmium; (23) Transfer the blocks to 70% ethanol (v/v); (24) Change 70% ethanol three times; and (25) Transport in 70% ethanol or follow the protocol for further dehydration in ethanol and embedding or critical point drying (see common trunk) (Table 1).
| TEM | ||
| Ethanol 70% | 15 min | 20°C |
| Ethanol 90% | 15 min | 20°C |
| Ethanol 100% | 30 min | 20°C |
| Ethanol 100% | 30 min | 20°C |
| Ethanol 100%/Epon 1/1 | Overnight | 20°C |
| Epon | 1 h | 20°C |
| Epon 1 (overnight) | BEEM capsules on top | 20°C |
| Epon | Fill BEEM capsules | 20°C |
| Oven | 67 h | 40-60°C |
| SEM | ||
| Ethanol 70% | 15 min | 20°C |
| Ethanol 90% | 15 min | 20°C |
| Ethanol 100% | 30 min | 20°C |
| Ethanol 100% | 30 min | 20°C |
| Ethanol 100% | Overnight | 20°C |
| Freeze and fracture | Liquid nitrogen | -196°C |
| Ethanol 100% | 30 min | 20°C |
| Critical point drying, phase 1 | CO2/ethanol | 16°C |
| Phase 2 or HDMS drying (see below) | 80 bar | 35°C |
| Sputter coating | Pt/Au |
For a summary of necessary chemicals and solutions, composition of fluids, see Table 2.
| Compound | Quantity |
| Cacodylate buffer 0.2 mol/L, pH 7.4 | 700 mL |
| Sodium cacodylate trihydrate (Sigma, C0250) | 22.9 g |
| MQ-(purified by ion-exchange)-water | 674.8 mL |
| HCl (0.2 mol/L) | 25.2 mL |
| Filter through 0.2 μm Millipore or Wattman filter paper | |
| Cacodylate buffer 0.15 mol/L, pH 7.4 | |
| Cacodylate buffer 0.2 mol/L | 900 mL |
| MQ-water | 300 mL |
| Filter through 0.2 μm Millipore or Wattman filter paper | |
| Glutaraldehyde fixative, 1.5% in cacodylate buffer 0.067 mol/L | |
| Cacodylate buffer 0.2 mol/L | 575 mL |
| Sucrose (Sigma, S0389) | 17.215 g |
| Glutaraldehyde solution 70% (Sigma, G7776) | 36.96 mL |
| MQ-water | 1113.04 mL |
| Filter | |
| Osmium tetroxide 1% in phosphate buffer1 | 90 mL (6 × 15 mL) |
| Osmium tetroxide 4% for EM (Sigma, 75632) | 22.5 mL |
| Phosphate buffer 0.2 mol/L | 45 mL |
| MQ-water | 22.5 mL |
| Washing buffer 1 | |
| Cacodylate buffer 0.2 mol/L | 30 mL |
| Sucrose | 0.9 g |
| MQ-water | 60 mL |
| Washing buffer 2 | |
| Phosphate buffer 0.2 mol/L | 45 mL |
| MQ-water | 45 mL |
| Phosphate buffer 0.2 mol/L pH 7.4 (200 mL) | 200 mL |
| 0.2 mol/L Na2HPO4.2H2O (17.8 g in 500 mL MQ-water) | 162 mL |
| 0.2 mol/L NaH2PO4.H2O (13.8 g in 500 mL MQ-water) | 38 mL |
Wedge biopsies of roughly 1 cm × 1 cm × 1 cm (or less), including the Glisson’s capsule at two sides of the wedge, are taken from the margin of a liver lobe as soon as the surgeon/operator has access to the liver. The operator should be cooperative in order to assure that freshness of the tissue is an absolute priority. Directly after opening of the abdomen via a chevron incision, the liver is visualized and a wedge is taken with a sharp scissor from the edge of segment 5 or 6, without manipulating the tissue. Bleeding at the biopsy site can easily be controlled using diathermia or argon laser. In a consecutive series of 150 patients no rebleeding at biopsy sites was reported (unpublished results). (1) The tissue is immediately transferred to a 50-mL vessel, filled with PBS (pH 7.4) at 37°C; (2) The tissue is transported to an annex to the operation theater, where injection perfusion with glutaraldehyde fixative is performed in a Petri dish filled with saline; (3) The wedge biopsy is held at a corner by a forceps and is injected by a 25 G syringe from multiple sides with 1.5% glutaraldehyde fixative, until a discoloration and hardening of the tissue, comparable to total liver perfusion, is obtained; (4) Care should be taken that the injection needle does not operate as a biopsy needle; it should be and stay completely filled with glutaraldehyde during injection into the tissue; (5) After injecting the needle into the tissue, parallel to the capsule rim, the needle should be withdrawn a few millimeters before starting injection of the fixative fluid. The idea is to create a space within the tissue in which the fixative can spread out; (6) Injections should be repeated several times until the blood is flushed out of the tissue and the consistency has changed to that of a hard-boiled egg; (7) The time between excision of the wedge and perfusion with fixative is critical. Total glutaraldehyde time (before washing and before osmication) should not exceed 20 min; and (8) After perfusion with glutaraldehyde, the biopsy is rapidly transported to the laboratory, where slices (1 mm thick), strips (1 mm × 1 mm × 5 mm), small flat slices (5 mm × 5 mm × 1 mm) and tissue blocks (1 mm × 1 mm × 1 mm) can be cut under fluid with a clean, sharp razor blade.
The percutaneous liver biopsy procedure starts with local anesthesia with 1% lidocaine. Under real-time ultrasound guidance, the liver and the biopsy needle are imaged throughout the procedure. The biopsy is taken by a cutting-type needle and a spring-loaded device. A 16-gauge needle is placed into the liver parenchyma before the device is triggered. This results in a liver specimen of 1-2 cm in length, with the diameter being dependent on the size of the biopsy needle (1-1.8 mm). After collecting the biopsy, the fresh tissue is placed in a Petri dish in which 3 mm × 1 mm × 1 mm pieces of the ends of the cylinder are cut. The remaining tissue is used for diagnostic purposes in the pathology department and separately undergoes routine pathology fixation. This procedure should not take longer than 30 s. The two cylinder-shaped tissue pieces of 3 mm × 1 mm are covered with fixative, cut into 1 mm × 1 mm × 1 mm pieces and transferred to a 15-mL vessel that is filled with 1.5% glutaraldehyde fixative at room temperature. The vessel is gently shaken a few times. The total glutaraldehyde time (before washing and osmication) should be no less than 1 h, in order to allow the fixative to penetrate the tissue. After glutaraldehyde, the tissue will be further processed in washing buffer, osmium fixative, and ethanol dehydration.
The procedure is as follows: (1) cells are cultured on 1 cm diameter glass or plastic coverslips (0.17 mm thick) in wells of culture dishes; (2) cultures are washed three times with 37°C buffer to rinse away dead cells, cellular debris and precipitates; (3) culture medium is replaced with glutaraldehyde fixative; (4) one should take care that the cells are always covered by a layer of fluid, so that the meniscus does not touch the cells; (5) fluids are changed several times to ensure complete replacement; (6) wash in cacodylate buffer; (7) postfix in 1% osmium tetroxide in phosphate buffer; (8) wash in phosphate buffer; and (9) dehydrate by starting with 70% ethanol (Table 1, Figures 2 and 3).
Critical point drying (CPD) is used routinely to dry samples for SEM[24]. Nation[25] has reported an alternative method that consists of air-drying of insect tissues by rapid evaporation of hexamethyldisilazane (HMDS), which has a very low surface tension. This is supposed to avoid fracturing and destruction of the specimen during drying. In spite of the advantages of HMDS, such as the absence of high pressure equipment, CPD seems to be the most frequently used method. Drying of biological samples by CPD also causes a shrinkage of about 30% of the volume[26]. We have routinely and successfully applied HMDS to cultured liver cells[27]. HMDS drying takes only 3 min instead of the laborious and time-consuming CPD process. We also have applied HMDS drying to perfusion-fixed liver tissue, and during a comparison with CPD, no differences could be seen between the two methods (Figure 3).
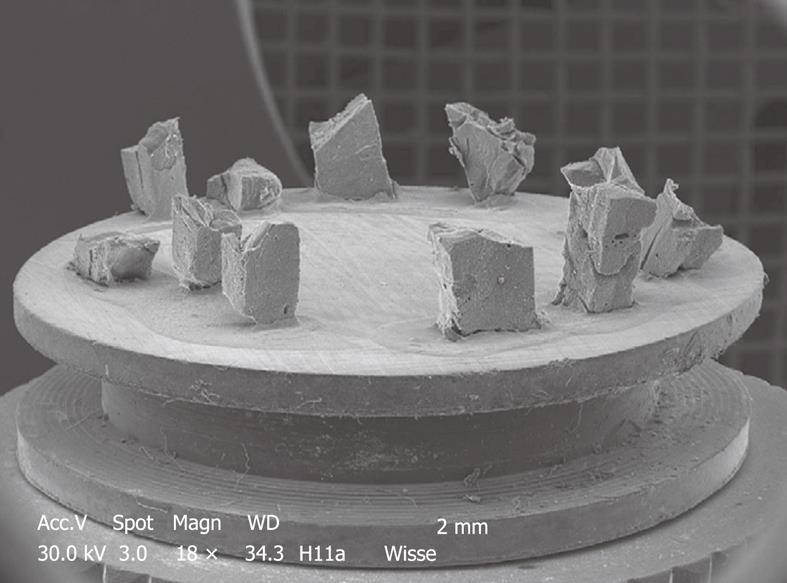
After 100% ethanol, samples are immersed for 3 min (cell cultures) or 10 min (liver tissue) in 100% HMDS. After HMDS, the samples are removed from the culture wells and excess HMDS is blotted away by filter paper. The samples are then transferred to a desiccator for 25 min to avoid water contamination. After drying, the samples are mounted on stubs (Figures 4 and 5) and are sputter-coated with 10 nm gold and made available for SEM investigation.
Follow the instructions given for TEM and make sections of 0.5-1 μm, stain with Toluidine Blue (1% with 2% borate in distilled water), cover sections with Entellan and a 0.17-μm glass coverslip. In case of sufficient contrast, use bright field microscopy, in case of low or insufficient contrast, use phase contrast or interference contrast.
When using experimental animals, fixation should be preceded by anesthesia. Undoubtedly, the success of perfusion also depends on the handling of the animals. Animals should be minimally stressed before and during the operation. Therefore, it is recommended to have the animals about 2 h before the surgical procedure within the operating room to accustom them to the environment and reduce the level of stress. Stress hormones affect the physiology and fine structure of organs. Furthermore, animals in discomfort are not only difficult to manipulate, but the stress hormones might cause vasoconstriction and directly narrow or even block some vascular beds, thereby affecting the outcome of the perfusion procedure and also the fine structure of the cells.
Some researchers use ether as an anesthetic. Although this is a rapid procedure, it should be discouraged as it does not provide any pain relief, nor does it have muscle-relaxant properties. Furthermore, ether anesthesia is difficult to control, and often leads to an overdose, typically to be encountered during the initial stages of the operation, resulting in body temperature drop, shock and even accidental death of the animal. Animals that are in distress and anesthetized with ether are difficult to handle and operate on and chances for a successful liver perfusion are low. As outlined in the protocol section, agents such as pentobarbital and chloral hydrate, preferably combined with pain inhibitors, are the first-choice anesthetics. The period of anesthesia should be as short as possible[22]. Anesthesia can be checked by gently touching the cornea of the animal, followed by gently squeezing the paw pads. When no reaction occurs, the animal is ready for operation. When laparotomy is performed, hypovolemia should be prevented and veins and arteries should be well perfused and red[22].
The need for preperfusion with buffered physiological saline is still being discussed. The argument used in its favor is to wash plasma and blood cells away in order to avoid coagulation, precipitation of blood constituents and aggregation of blood cells by glutaraldehyde. Such precipitates could impair the flow of fixative through the liver. Theoretically this is correct, but experience has taught us that plasma constituents and blood cells do not have enough time to react and precipitate when glutaraldehyde is flushed through the liver straightaway. It is possible to flush the liver, e.g. of a rat, within 15-30 s without any notable obstruction. After 30 s, the way should be free to continue perfusion of the fixative. The point is that fixative and biological material need time to react, and perfusion might be successfully established before precipitation, coagulation and cellular aggregation occurs. A compromise might be to fill the tubes used for perfusion with buffered physiological saline, which results in a small “wave” of saline preceding the glutaraldehyde, the two being sequentially distributed through the entire microcirculation of the liver[22].
When preperfusion is still preferred, not more than 30 s preperfusion with buffered physiological saline at a physiological flow rate is necessary to free the liver of plasma and red blood cells. From this moment onwards, glutaraldehyde fixation can be started. The success of perfusion correlates with disappearance of red blood cells from the liver and can be followed by the change in color of the organ (dark red brown to yellow-brown). The presence of blood can also be monitored by observing the effluent. The success of fixation correlates with the change in consistency of the organ (from soft and pliable to rigid/stiff like a hard-boiled egg). Successful perfusion fixation shows the start of these phenomena within 20 to 30 s.
Air bubbles might form within the flexible tubing that connects the perfusion needle with the vessels that contain the perfusion fluids. Bubbles appear often when improperly cleaned tubing is used, or are caused by long waiting times or temperature differences between the different fluids. Air bubbles are disastrous in liver perfusion and act as blockers of the liver microcirculation. They are a major source of perfusion failure[5]. It is therefore recommended to check the tubing regularly. Air bubble traps are commercially available and are being used in clinical settings. They certainly are advised when using larger animals (e.g. rabbits, dogs or mini pigs) when high-volume perfusion is required.
As soon as perfusion is started, it is mandatory to open the vascular system by incising the vena cava in order to avoid the buildup of pressure. Enhanced pressure damages endothelial cells as well as parenchymal cells[28].
Formaldehyde has found no application in perfusion fixation of the liver. Glutaraldehyde has better stability in solution and has two reactive groups per molecule, therefore, it cross-links more easily, has lower osmotic pressure and gives better results[29]. Nevertheless, it might be useful to preperfuse the liver with formaldehyde. Since formaldehyde has a much slower reaction time than glutaraldehyde[29], it could be possible to preperfuse the liver with 3%-4% buffered (and freshly prepared) formaldehyde. Care should be taken for the high osmotic pressure of formaldehyde solutions. Formaldehyde preperfusion would allow flushing of blood and its constituents from the tissue (within 1 min) and starts mild fixation at the same time. Glutaraldehyde perfusion can be started directly thereafter and makes clear the way to do the real job of fixation in the absence of plasma and blood cells.
The choice of a roller pump vs gravity perfusion is a matter of personal preference. The roller pump releases moderate artery-like pulses of fluid (depending on the tube diameter), whereas gravity flow is constant and results in constant flow or pressure. The choice is considered not to be decisive for perfusion quality.
Since the liver circulation can be characterized as a high flow/low pressure system, discussions about perfusion pressure during fixation have limited value. It is believed that flow rates within wide limits do not enhance perfusion pressure, since the open system and sponge-like structure of this typical microcirculation do not allow pressure to build up. This situation changes when the fixative precipitates blood proteins, aggregates blood cells and introduces coagulation. When attention is paid to this condition, physiological flow rates (the rule of thumb: weight of liver in grams = milliliters of fluid per minute) should give good results.
Experience over the years has taught us that the outcome of fixation by perfusion also depends on the choice of the needle. The diameter of the needle, i.e. the gauge (G), determines the maximum flow to be delivered. This gauge value, together with the liver blood flow and pressure for a particular type of species, are important factors to consider. 18 G needles, for example, with a typical diameter of 1.2 mm, have a maximum perfusion flow by 12 cmH2O gravity of 80 mL/min. This is evidently too low when livers of rabbits (177 mL/min) or dogs (303 mL/min) are concerned[30].
18-23 G needles (diameter 1.27-0.64 mm) are ideal for liver perfusion in animals such as rats and mice (Figure 1D1); whereas the 12 G (diameter 2.77 mm) needle type is recommended for larger species such as rabbits and minipigs (Figure 1D3). One can benefit from studying a catalogue of the needle catheter-type of needles that are on the market. A needle catheter (Figure 1D2) comprises a metallic needle-guide that consists of a cannula with an end grip - the catheter - that covers the needle-guide when it is retracted after cannulation. Hence, after the needle catheter (inlet) is inserted into the portal vein and secured by ligatures, it is possible to insert the plastic tube (outlet) further into the portal vein, without rupture of the vessel. An additional benefit is that the atraumatic outlet of the catheter has a round shape, which results in more efficient perfusion when compared to the pointed-end needles. Accidental puncture of the wall of the portal vein at the start of perfusion is a major source of perfusion failure. In case of perfusion failure, an emergency solution is offered by the technique of injection fixation. In that case, the steps of protocol 2 should be followed. This might save losing an animal from the experimental setup.
A point of interest in choosing the right diameter of needle lies also in the effect of “jet streaming” that is caused by a too-small needle orifice. With an easy, moderate flow, the fluids probably distribute evenly through the branches of the portal vein, whereas a jet-stream might, simply because of its strength and direction, blow the fluids into one branch of the portal vein, thus causing uneven distribution and pressure of fixing fluids in the different liver lobes.
When injecting glutaraldehyde into a wedge biopsy, one should take care to introduce a fluid-filled needle into the tissue. When the needle cuts the tissue as it does in the case of a needle biopsy, the sampled tissue comes out at the moment the operator starts injecting the fixative. Instead, if the operator fills the needle with fluid and cuts through the tissue without allowing the tissue to enter the lumen of the needle, this effect can be avoided. Moreover, when the fluid-filled needle is retracted slightly after reaching the maximum track for injection (evidently before starting perfusion), a space will be created within the tissue, from where fluids will distribute easily in all directions as soon as the injection of the fixative solution starts.
When LM sections, SEM preparations and ultrathin sections of liver tissue or cell cultures are studied, these three approaches provide information to the investigator, each in its own way.
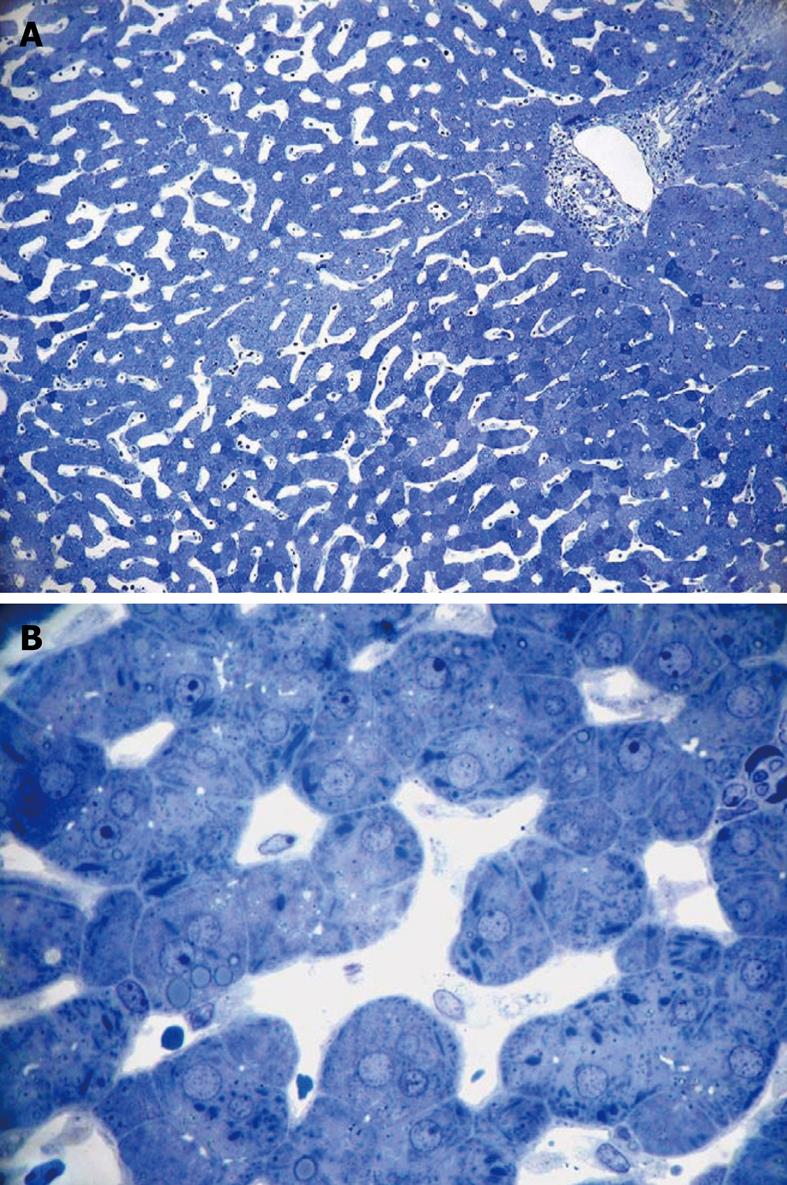
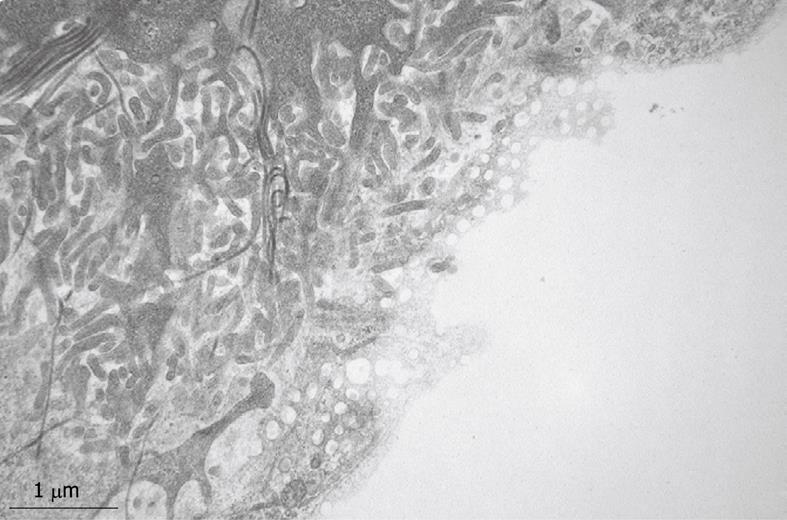
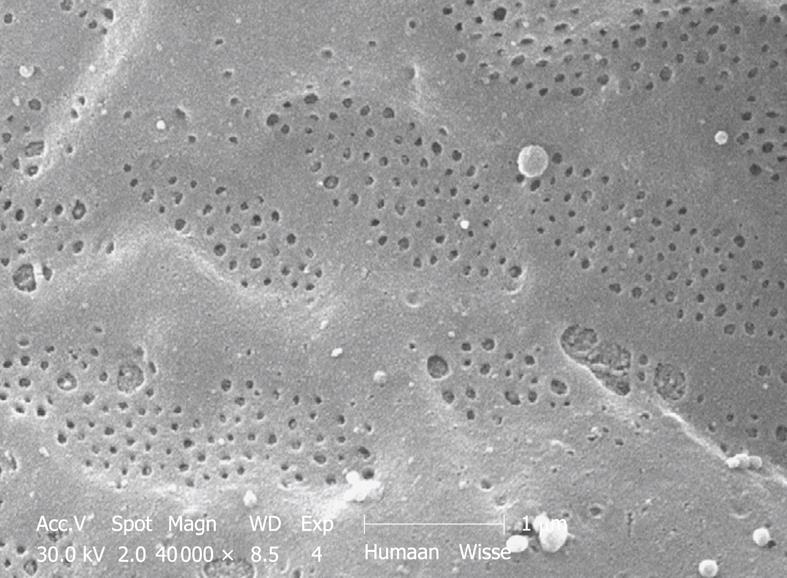
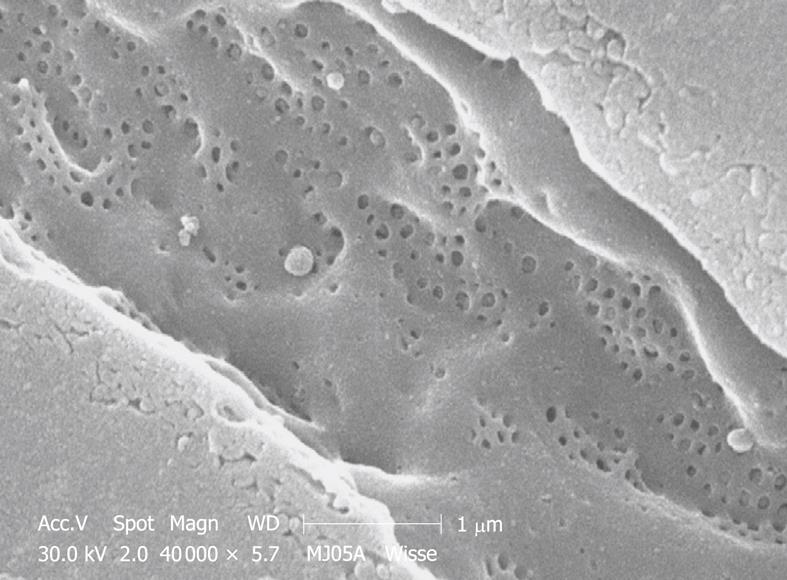
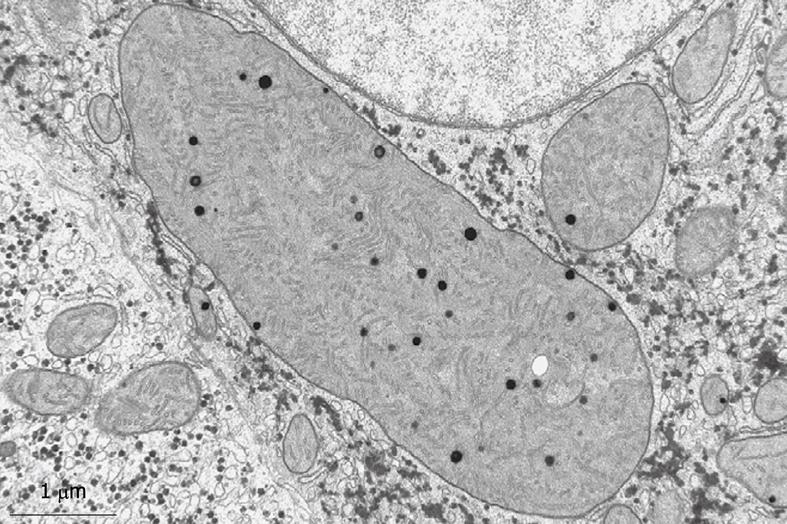
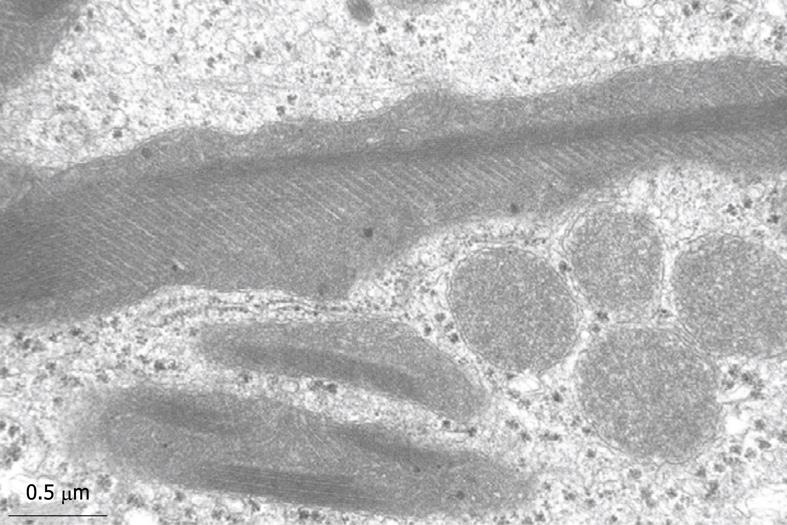
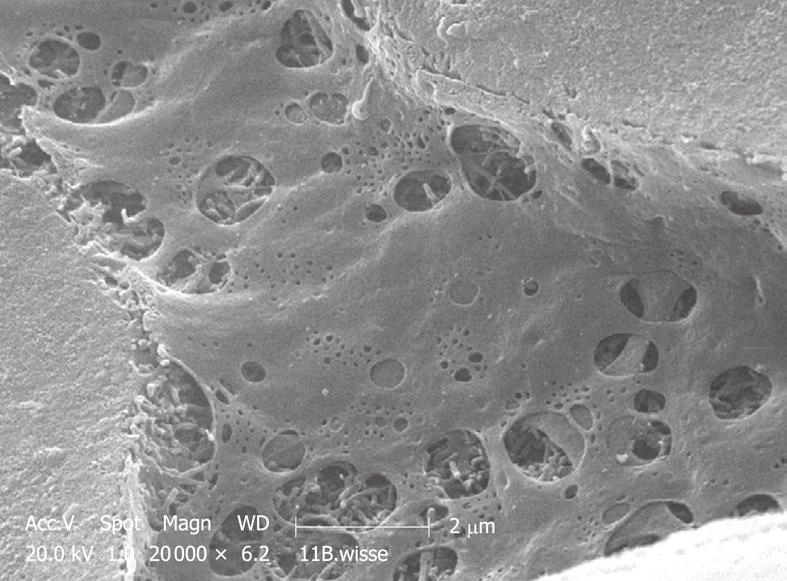
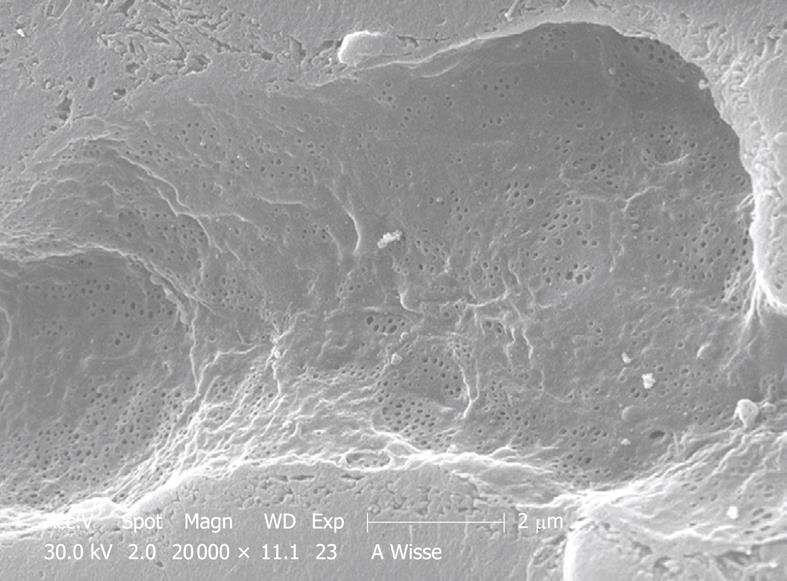
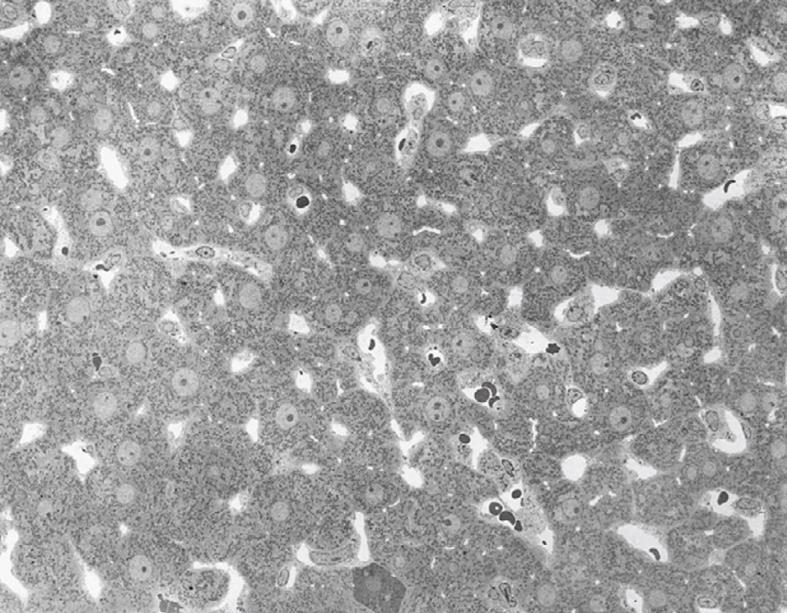
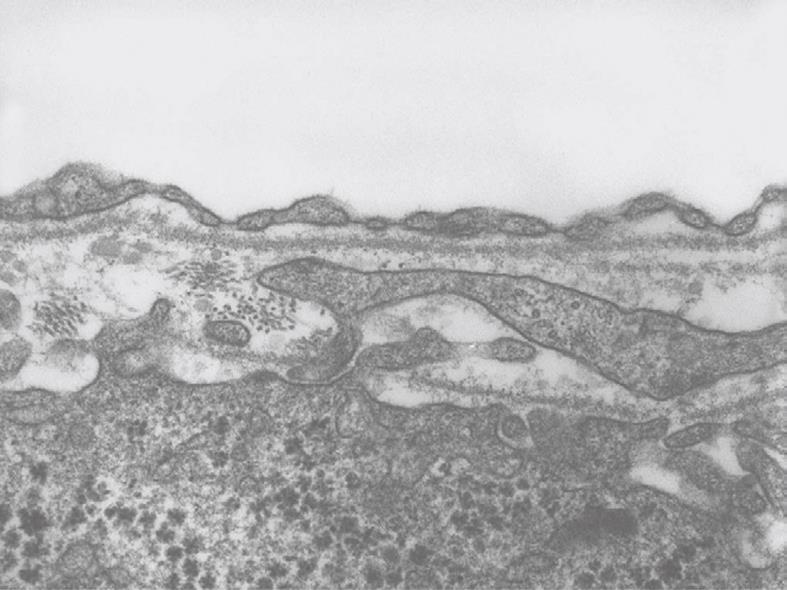
Toluidine-Blue-stained 1-μm sections provide information at magnifications from 5 × to 1000 × over wide areas as compared to TEM sections (Figure 6A and B). These sections already show the criteria for good or bad fixation (see discussion), such as open sinusoids (Figure 7A and B), absence of blood cells, equal density of similar cells, and open bile canaliculi (particularly in the periportal area). Recognition of typical histological details such as the central vein, bile ducts and portal vein with its accessory structures and many cells, such as parenchymal, sinusoidal and visiting cells, together with conditions such as steatosis (Figure 8A and B), fibrosis and inflammation, can be observed at an estimated system resolution of about 0.2 μm. Crucial details such as endothelial fenestrae (measuring 140 nm in mice and rats, and 105 nm in humans and some rabbit strains) (Figures 9, 10, 11 and 12), although present, therefor escape observation by LM. Perfusion fixation and plastic embedding also add details to an LM study. In the case of immersion fixation, paraffin embedding and hematoxylin and eosin staining, observations are mainly restricted to the size, shape and position of entire cells and their nuclei. In the case of perfusion fixation and plastic embedding, intracellular details can be observed in the LM in greater detail, with the knowledge that the same structures of the same preparation can also be seen in maximal detail by TEM. For example, the typical giant mitochondria that occur in the human liver parenchymal cells (Figures 13 and 14) can easily be observed in plastic sections by LM, and can be seen in greater detail by TEM of the same specimen. Therefore, the Toluidine-Blue-stained plastic section is a useful histological introduction to further detailed study by TEM.
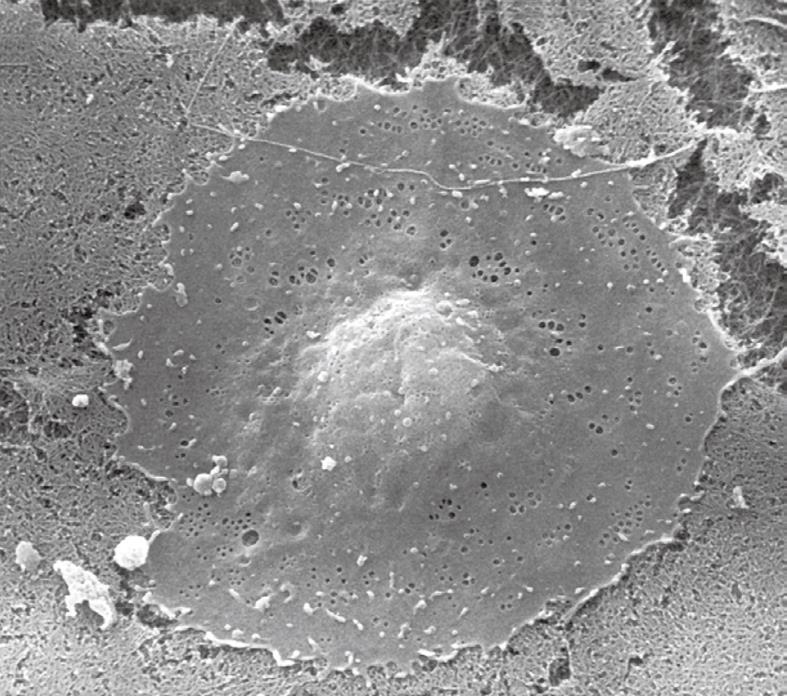
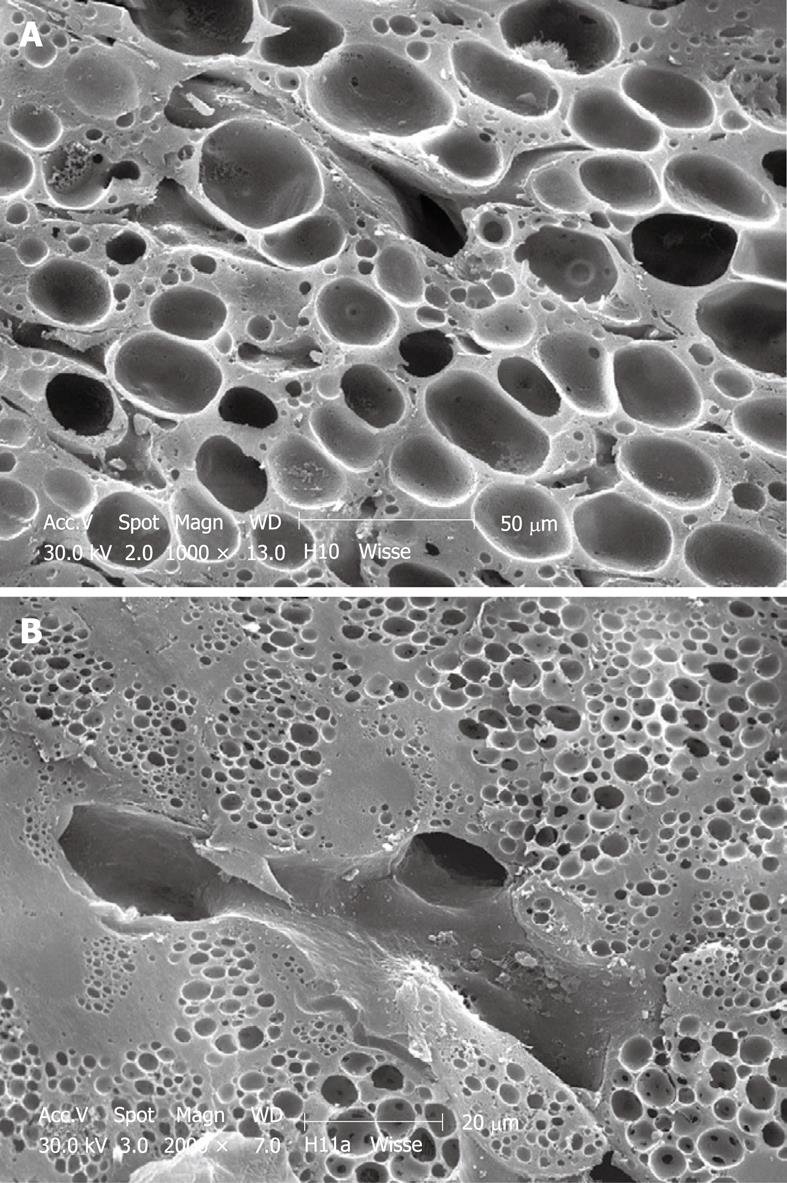
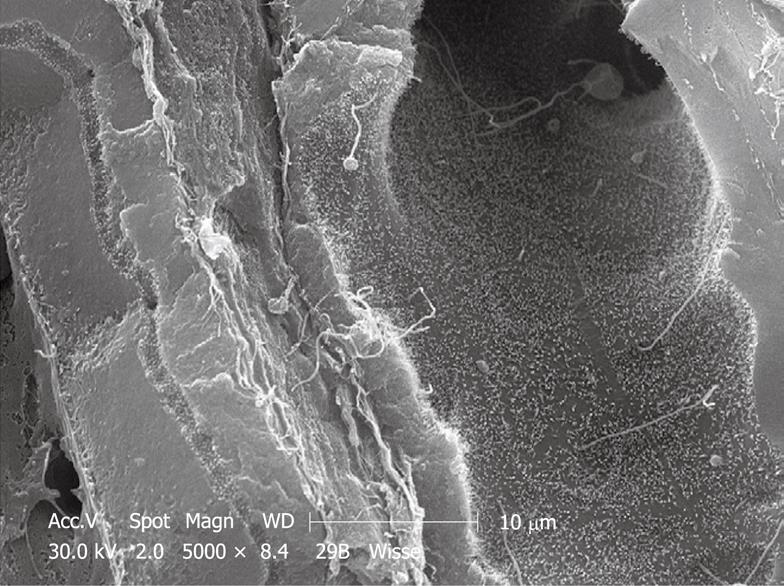
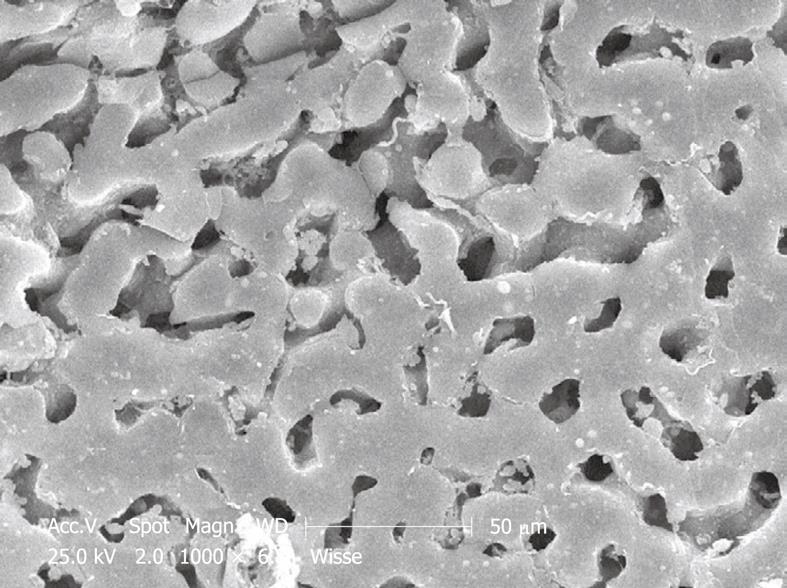
Perfusion-fixed total organs or injection-perfused wedge biopsies also make ideal preparations for SEM study. When tissue strips of 1 mm × 1 mm × 5 mm in 100% ethanol are frozen and fractured (before CPD) at the temperature of liquid nitrogen, the fracture surface is more or less flat and easily correlates with a 2D histological section. Unfortunately, intracellular details are rare, but some cell surface details are abundant. SEM offers details about the endothelial lining of the sinusoids, easily shows the presence of fenestrae (Figures 11 and 12), reveals the presence of endothelial gaps (Figures 15 and 16), shows some details about the space of Disse, and shows the central and portal veins and the bile duct with its typical epithelial cells with one cilium each (Figure 17). Alternatively, fracturing the tissue in the already dry state after CPD (Figure 17) reveals the lateral cell membranes of parenchymal cells together with the 3D network of bile canaliculi, strictly separated from the network of sinusoids. SEM preparations are very useful in judging conditions such as sinusoidal dilatation (Figure 18) or sinusoidal obstruction syndrome[31]. Sinusoidal dilatation occurs in regions apparently different form normal, where the average sinusoidal diameter is measured as 4-6 μm by SEM. In SEM preparations, the dimensions of many structures are reduced by an average 30% shrinkage as a result of the drying procedure[23,24]. Therefore, the use of SEM preparations to measure or judge the size of any detail in the preparation should be avoided.
TEM of perfusion or injection fixed liver tissue reveals the fine structure of all the different cell types in the tissue. It is assumed that the histological topography and the shape of the cells are optimally preserved due to hardening of the intact tissue by glutaraldehyde perfusion. This initial hardening process needs only a few minutes for the entire organ. Important to note is the fact that this condition can be obtained without touching or deforming any part of the organ or tissue. It is assumed that the fluids themselves do not cause distortion as reported for immersion fixation[19].
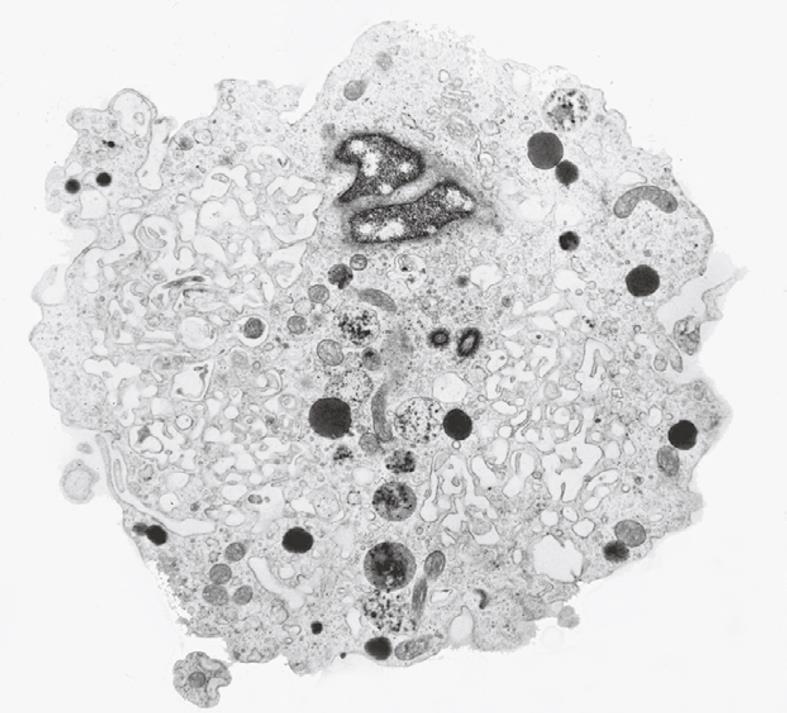
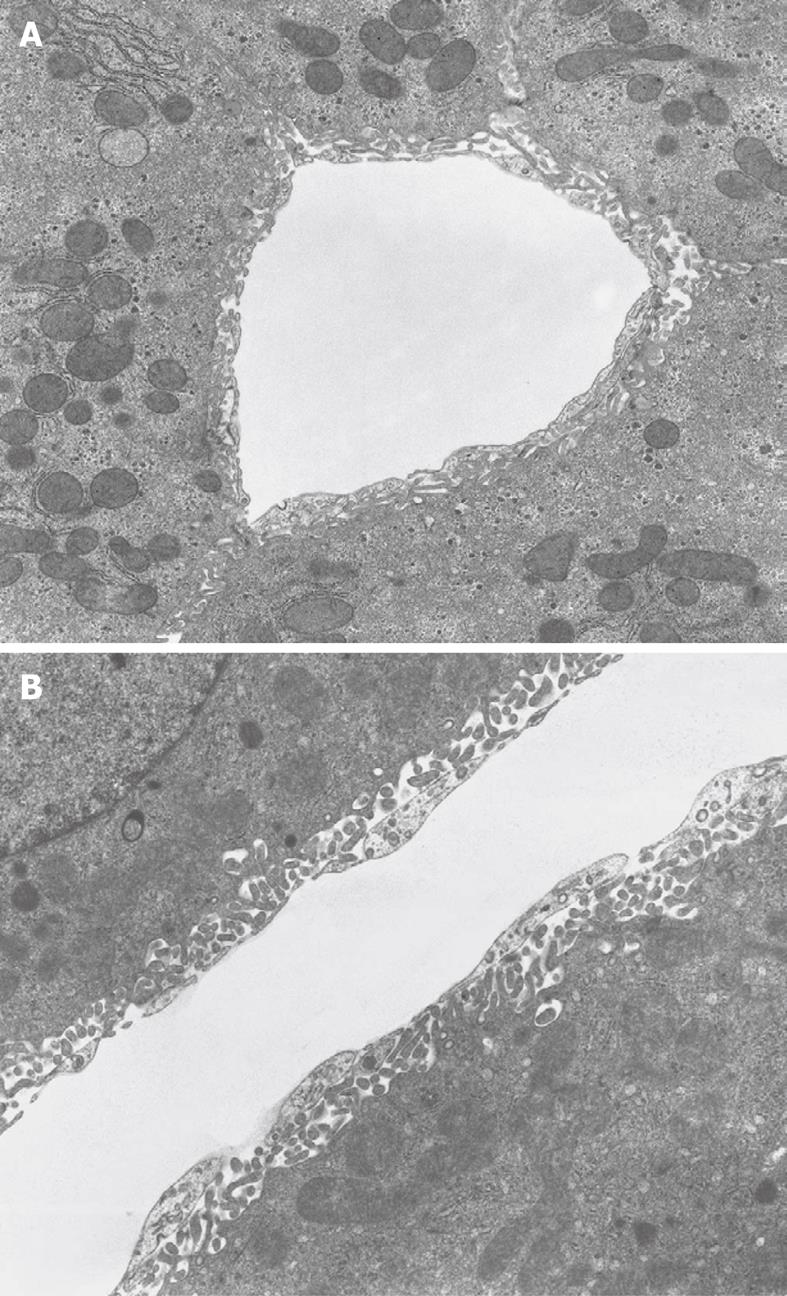
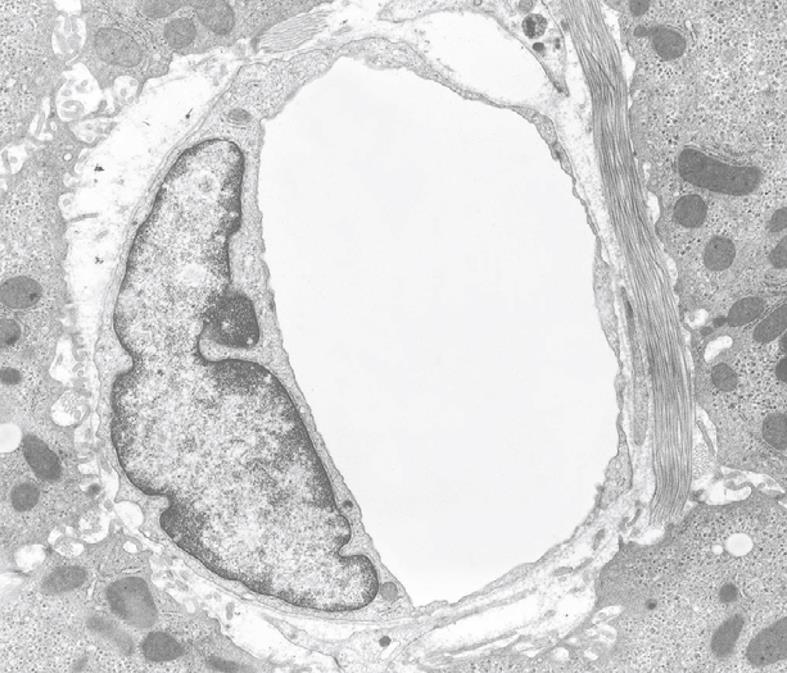
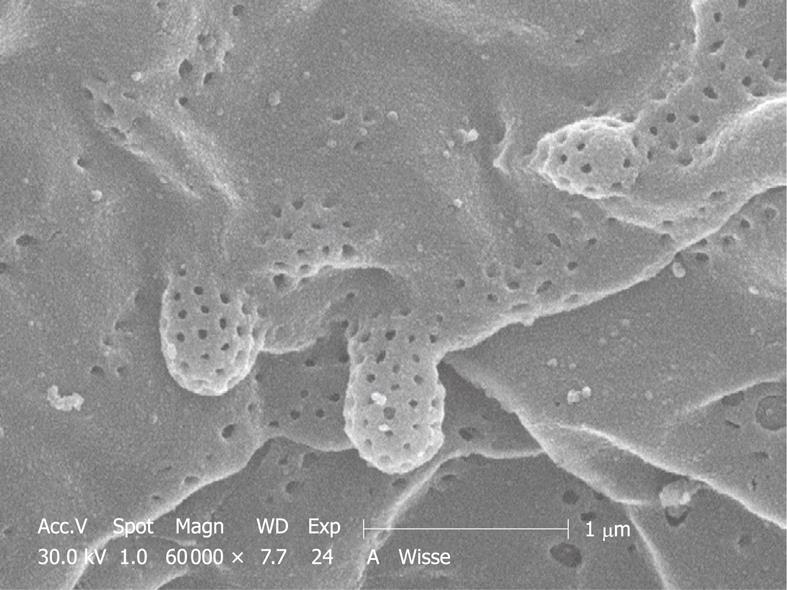
Inherent to the observation with TEM, abundant details can be observed in all different cells and organelles at magnifications in the range of 50-1 000 000 ×, with a resolution in the order of about 5 nm. A low magnification survey of sections at 50-600 × (by using a different combination of TEM lenses) (Figure 19), provides information about the quality and content of the sections, and allows the preselection of interesting areas in the preparation. This low magnification TEM is also recommended as a bridge to the study of Toluidine-Blue-stained sections for LM. TEM observations also reveal the difference between sinusoids and capillaries (Figures 20 and 21). Perfusion fixation also reveals extraordinary structures such as pored domes[32] or defenestration centers (Figure 22)[33]. Higher magnifications provide supramolecular information about the cytoskeleton, glycogen rosettes, ribosomes, mitochondrial cristae, chromatin fine structure, nucleolar composition, unit membrane structure, Golgi apparatus, the presence of iron storage proteins, and lysosomal contents.
Results obtained with cell cultures follow the general pattern described for the three kinds of specimen already discussed. In the case of cultured cells, fixation at the cellular level is quite easy. A big difference is that fluids have direct access to the cells. Therefore, precautions should be taken to avoid over-fixation and extraction, which can result in damaged membranes and extracted cells.
A detailed literature survey has revealed that there are three commonly used fixation methods for EM studies of liver tissue. For a review see Hayat[21]. Since Fahimi[5] and Wisse[6] have demonstrated that perfusion fixation, rather than immersion fixation, is essential in preserving the fine structure and architecture of the liver, perfusion-fixation has been the gold standard ever since, especially for the study of the sinusoids and sinusoidal cells in experimental animals[6].
Irrespective of the numerous methods available to prepare liver tissue for EM studies, perfusion-fixation via the portal vein is decidedly superior and more reproducible compared to other methods of fixation, in particular immersion fixation. Injection of the fixative into wedge biopsies, however, comes close and when Toluidine-Blue-stained LM sections are used to select tissue for the quality of fixation, this type of fixation can replace that through the portal vein. Perfusion-fixation via the portal vein and immediate arrest of the liver circulation (including the hepatic artery), meets the conditions of instantaneous and simultaneous fixation of all cells in the organ and restricts gradients of fixation to the cellular level. Fahimi[5] and Wisse et al[22] have reported the success of portal vein perfusion, followed by retrograde perfusion with fixative through the hepatic vein, which results in more evenly fixed tissue. By staining with Schiff’s reagent, we could demonstrate that within 5-7 min, liver tissue stains equally well after such “push-pull” fixation[22], which indicates that saturation of the tissue with glutaraldehyde is obtained over this short time interval. Perfusion through the aorta[28] or any other indirect route may be successful, but seems unnecessary when the portal vein is available. We can summarize the advantages of perfusion fixation as follows: (1) instantaneous and simultaneous fixation of all cells in the organ; (2) avoidance of hypoxia and autolysis; (3) fewer problems resulting from diffusion and exhaustion of the fixative during immersion; (4) use of lower concentrations of fixing chemicals is possible; (5) glutaraldehyde perfusion hardens the tissue, which allows easier cutting; (6) less mechanical damage, deformation or distortion; (7) empty vessels and sinusoids allow better penetration of washing fluids, osmium and ethanol; (8) exact timing and shorter fixation times are possible; (9) more and better preservation of histological relationships and fine structural details; (10) better preservation of cytochemical reactive sites; (11) fewer artifacts; (12) perfusion can be extended to a program of reagents, fixatives and buffers without further manipulation; (13) less accessible organs and tissues may be fixed before excision; and (14) easy to directly judge good perfusion and fixation by change in color and hardening of the organ.
An additional advantage of the method is that perfusion-fixed liver tissue is firm enough to be cut into finer pieces without deformation, supposedly leaving cells in their right histological arrangement. Hand cutting by a sharp, thin razor blade allows the cutting of glutaraldehyde fixed tissue into tissue blocks of 1 mm × 1 mm × 1 mm (for TEM) or slices (1 mm × 10 mm × 10 mm) for flat embedding and large sections for LM, and strips of 1 mm × 1 mm × 5 mm for further preparation for SEM. It is assumed that the open vessels and sinusoids allow the penetration of osmium and other fluids in a much better way as compared to immersion fixation, for which a wall of fixed components at the outer rim of the tissue stands in the way of and will still react with the penetrating fluid.
Researchers may choose from two perfusion methods that both result in excellent preservation of hepatic tissue. One uses gravity to perfuse the vascular bed at 12 cm water pressure, a value that corresponds to the physiological portal pressure (Figure 1A); whereas the other method actively pumps solutions through the portal vein with the aid of a low-speed peristaltic pump. In both cases the typical rate of 1 mL/min per g liver weight (Figure 1B) should be achieved.
Perfusion fixation seems to be difficult when a human needle biopsy is to be investigated by EM. Attempts have been made by Bioulac-Sage et al[14] and Balabaud et al[8] to flush fluids through the tissue of a liver needle biopsy arrested at one end of a narrowing Pasteur pipette (holding the tissue) with a slightly elevated pressure, while aspirating fluids at the other end with slightly negative pressure. Muto et al[10], Vonnahme[12] and De Wilde et al[15] have obtained good fixation results on human or rat liver needle biopsies by injecting glutaraldehyde with tiny glass or metal needles at intervals into the cylindrical tissue. De Wilde et al[15] have used low-melting-point agar to arrest and handle the tissue. Surprisingly, and in spite of good results, this technique has not found its way into clinical practice, and it is not mentioned in the needle biopsy review of Rockey et al[3].
It is evident that immersion-fixed needle biopsies have provided a wealth of information about the fine structure and deviations of parenchymal cells. David et al[34] have demonstrated by morphometric methods that there are only slight differences between parenchymal cells from immersion- or perfusion-fixed tissue. It is recommended to limit the study of immersion-fixed needle biopsies to the outer and middle zone of cells that are well fixed. They can easily be found when material is preselected by Toluidine-Blue-stained LM sections. Apparently, the structure of sinusoids and sinusoidal cells, as damaged as they are after immersion fixation, has not until now played a significant role in clinical practice.
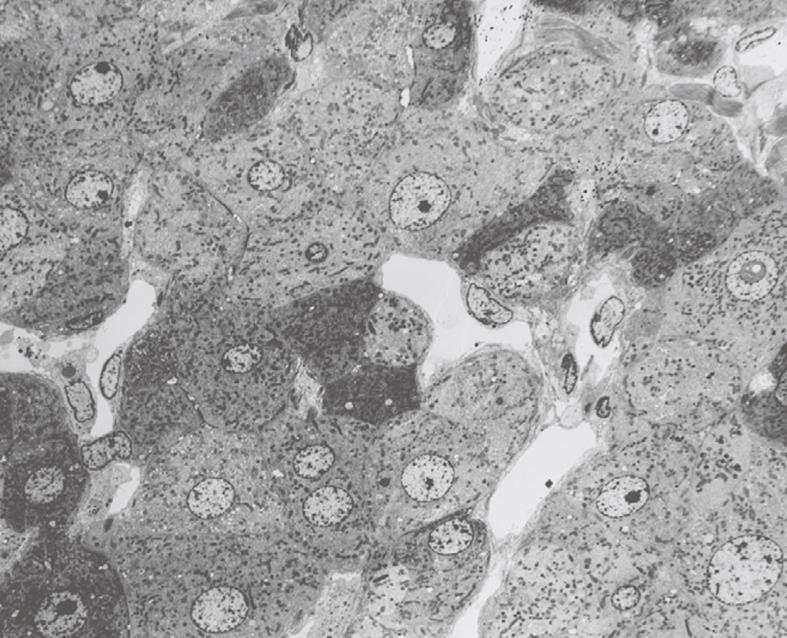
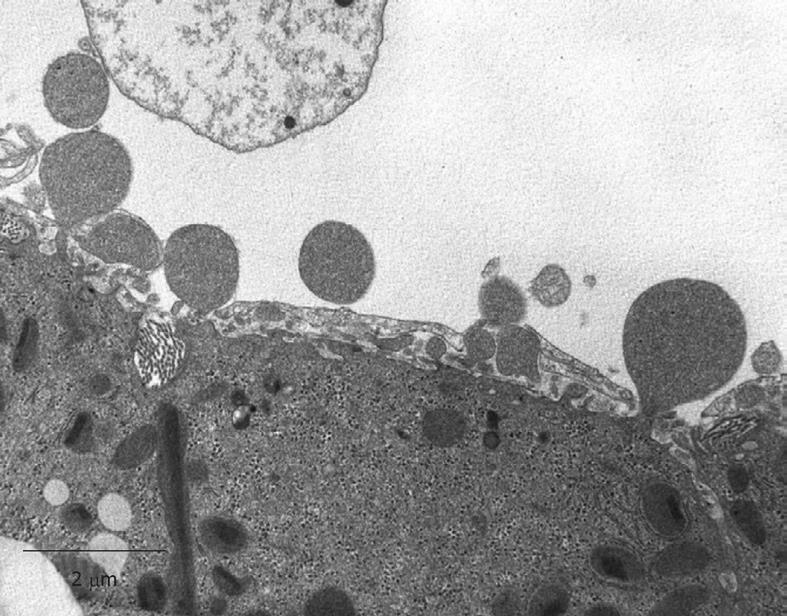
With regard to artifacts, we remember a citation from one of the founding fathers of EM, George Palade, who said that one of the major difficulties in EM is to distinguish between genuine structures and artifacts. Some even say that EM is “an art of artifacts”. It takes indeed a lot of experience and insight to distinguish between real structures and artifacts. Alternative methods are scarce, but sometimes it helps to compare results of chemical fixation (as summarized in this review) with alternative techniques such as freeze fracture of fresh tissue[6]. In equilibrium with the fact that artifacts are not easy to define and to prove, it is also difficult to indicate the true nature of real structures and their function. Artifacts in a specimen can be caused during one or more of the many steps of sample preparation, and can be caused by anesthesia, osmotic pressure, quality of the reagents, inadequate operation, pH, temperature, postmortem changes or autolysis, slow or incomplete fixation, cutting of the tissue, postfixation, dehydration, distortion, embedding, sectioning, contrast staining, microscope conditions, (digital) photography, image storage, and handling. Examples of possible artifacts are the occurrence of endothelial gaps, shrunken cells, light cells next to dark cells (Figure 23), widening of the Space of Disse, changes in cell shape, changes in the rounded shape of the nucleus of the parenchymal cells, condensation of chromatin[19], relocation or disappearance of subcellular components (such as endothelial fenestrae[6]), swollen mitochondria, collapsing and blebbing (Figure 24) of cell membranes and vesicle formation in intercellular spaces.
With regard to the occurrence of gaps larger than fenestrae in the endothelial lining (Figure 15) a lot of discussion has taken place[22,23]. Indirect proof of their artifactual nature is given by the fact that, in intact animals, endothelial fenestrae have an apparent sieving effect on, for example, adenoviral vectors of 93 nm used for gene transfer[35,36]. The appearance of large gaps in the sinusoidal lining can result from osmolarity problems, from destabilization of the cytoskeleton or from the use of a high perfusion pressure during the washing and subsequent glutaraldehyde fixation during the perfusion-fixation procedures[28,34].
Other subtle artifacts are caused by a process often referred to as over-fixation or “weekend fixation”. People sometimes store their precious samples for hours, days or even weeks in glutaraldehyde fixative. Typical for those preparations is that they are rich in free vesicles that seem to form from loose phospholipids derived from the cell membrane. Conversely, blebbing of living parenchymal cells occurs at low oxygen and glutaraldehyde concentrations (Figure 24). Related to this is the clumping of individual glycogen inclusions, poorly staining cell membranes, and failure to achieve staining of glycogen in parenchymal cells. With regard to the transport of material between laboratories, we have good experience of sending samples in 70% ethanol by fast courier services, which are able to deliver between different continents within 1 or 2 d.
How does one assess the outcome of properly fixed liver tissue? In order to distinguish good quality of fixation of the liver, we recommend the following criteria: (1) sinusoids should be open; (2) plasma and blood cells should be practically absent in sinusoids; (3) similar cell types should show similar images; (4) endothelial fenestrae should be present; (5) bile canaliculi (especially in the periportal area) should be open[6,8,22,23]; and (6) nuclei of parenchymal cells should be round (When nuclei of parenchymal cells are elliptic, the nuclei are compressed in the direction of cutting in the ultramicrotome).
The following criteria can be use to distinguish bad fixation: (1) sinusoids are collapsed or largely destructed and still filled with plasma and blood cells; (2) dark and light cells occur next to each other; (3) different images of similar cells; (4) endothelial fenestrae are absent; (5) bile canaliculi are collapsed; and (6) irregularly shaped nuclei of parenchymal cells.
Fahimi[5] has immersed thin slices of perfusion-fixed liver tissue into distilled water. When they change to a white color, the fixation is insufficient. This is a simple, rapid and objective test for good fixation.
Although this paper focuses mainly on the study of ultrathin liver sections with TEM, SEM is also a powerful tool to assess the quality of perfusion-fixed liver tissue. The abundant presence of red blood cells within sinusoids is an indicator of improper perfusion. Sometimes investigators unwarily apply unrelated or unsuitable perfusion or fixation procedures that are fine-tuned for specific applications, tissues, species or even are not applicable for animal tissue material, such as microbial and plant sample preparation protocols. Animal tissue and their cell components have a typical osmotic pressure of 320 mOsmol. Since the osmolarity of the glutaraldehyde component of the fixative seems to be less important[19,37], the osmolarity of the buffers should match the osmotic values of the tissue. Isotonic solutions that include the osmotic pressure of glutaraldehyde have a swelling effect on cells[37]. The protocols described in this review have contributed to the success of EM studies in several groups. The composition of the fluids applied reports the use of sucrose, which is added to a 0.1 mol/L sodium cacodylate buffer to correct its osmotic value to 320 mOsmol.
In vitro perfusion of whole livers has been used often to study preservation conditions of livers for transplantation, or metabolic and physiological processes. It is important to note that perfusion fixation fits well into such schemes and provides essential information about the condition of those livers at the end of an experiment. In addition, perfusion can also be used to incubate the tissue for cytochemical reactions of enzymes, epitopes, and all other reactive elements within the tissue.
In a clinical environment, the immersion-fixed needle biopsy is an important standard. The role of needle biopsies in diagnosis, prognosis and management of patients with liver disease[3] makes the needle biopsy a gold standard, notwithstanding immersion fixation, paraffin embedding, thick 5-μm sections, and the use of low-magnification LM. Together with immunological techniques, specific staining and the professional training of pathologists, needle biopsies fulfill clinical needs. Pathological diagnosis[38] uses pattern recognition in tissues that reveal conditions such as steatosis, inflammation, hyperplasia and neoplasia. EM seems to be of limited or no use in diagnosis[3], in contrast to its use in research. However, EM still has a potential value in a clinical environment.
However, at the other end of the spectrum, there is a group of scientists that knows that perfusion fixation, plastic embedding and the use of EM provides details about cells and tissues down to the nanometer level. Surprisingly, EM does not seem to succeed in helping pathologists to improve further their diagnosis with data derived at this supramolecular level. One of the key elements in this process is, according to the present authors, the lack of use of perfusion fixation for the study of liver tissue from patients. Indeed, we suppose that applying this type of fixation will provide evidence that might be used to the advantage of patients, for understanding the pathogenesis of certain diseases. This was the motivation for writing this review; to summarize the techniques and bring them to the attention of those involved in the process of using microscopic observations to support diagnosis and prognosis of liver diseases. There seems to be a gap between the use of low-resolution LM observations on immersion-fixed, paraffin-embedded, 5-μm sections and high-resolution microscopy of perfusion-fixed tissue. We hope that this review might help to bridge that gap. Essential to this approach is the recognition of the fact that liver tissue should be fixed at the cellular level with fluids that are as close to physiological and physical conditions as possible.
A good fundamental knowledge of the fine structure and histology of the normal liver is needed because some experimental conditions, pathological processes and severe liver diseases result in outcomes comparable to bad fixation. Although it is difficult to decide between genuine and artifactual structures in normal liver, the decision becomes even more difficult when disease conditions are added to the process.
Peer reviewer: Dr. Lisardo Boscá, Professor, Instituto de Investigaciones Biomédicas Alberto Sols (CSIC-UAM), Arturo Duperier 4, 28029 Madrid, Spain
S- Editor Tian L L- Editor Kerr C E- Editor Lin YP
| 1. | Geuze HJ. A future for electron microscopy in cell biology? Trends Cell Biol. 1999;9:92-93. |
| 2. | Braet F, Ratinac K. Creating next-generation microscopists: structural and molecular biology at the crossroads. J Cell Mol Med. 2007;11:759-763. |
| 3. | Rockey DC, Caldwell SH, Goodman ZD, Nelson RC, Smith AD. Liver biopsy. Hepatology. 2009;49:1017-1044. |
| 4. | Claude A, Fullam EF. The preparation of sections of guinea pig liver for electron microscopy. J Exp Med. 1946;83:499-503. |
| 5. | Fahimi HD. Perfusion and immersion fixation of rat liver with glutaraldehyde. Lab Invest. 1967;16:736-750. |
| 6. | Wisse E. An electron microscopic study of the fenestrated endothelial lining of rat liver sinusoids. J Ultrastruct Res. 1970;31:125-150. |
| 7. | Bhatnagar MK, David LL, Vrablic O, Therien A, Blouin A. A simple method for perfusion fixation of avian liver for electron microscopy. Can J Zool. 1981;59:1179-1183. |
| 8. | Balabaud C, Boulard A, Quinton A, Saric J, Bedin C, Boussarie L, Bioulac-Sage P. Light and transmission electron microscopy of sinusoids in human liver. Sinusoids in human liver: health and disease. Rijswijk: The Kupffer Cell Foundation 1988; 87-110. |
| 9. | Burwen SJ, Jones AL, Goldman IS, Way LW, Dejbakhsh S. The perfused human liver wedge biopsy: a new in vitro model for morphological and functional studies. Hepatology. 1982;2:426-432. |
| 10. | Muto M, Nishi M, Fujita T. Scanning electron microscopy of human liver sinusoids. Arch Histol Jpn. 1977;40:137-151. |
| 11. | Sandström B. Liver fixation for electron microscopy by means of transparenchymal perfusion with glutaraldehyde. Lab Invest. 1970;23:71-73. |
| 12. | Vonnahme FJ. An improved method for transparenchymal fixation of human liver biopsies for scanning electron microscopy. Scan Electron Microsc. 1980;177-180. |
| 13. | Wisse E, Jacobs F, Topal B, Frederik P, De Geest B. The size of endothelial fenestrae in human liver sinusoids: implications for hepatocyte-directed gene transfer. Gene Ther. 2008;15:1193-1199. |
| 14. | Bioulac-Sage P, Lamouliatte H, Saric J, Balabaud C. [Perfusion-fixation of liver needle biopsy: technic]. Gastroenterol Clin Biol. 1984;8:656-659. |
| 15. | De Wilde A, Van Der Spek P, Devis G, Wisse E. On the fixation of needle biopsies of rat liver tissue as a model to study the fine structure of sinusoidal cells. Sinusoidal Liver Cells. Rijswijk: The Kupffer Cell Foundation 1982; 85-92. |
| 16. | Horn T, Christoffersen P. Perfusion fixation of hepatic needle biopsies for scanning electron microscopy. A methodological study. Liver. 1986;6:89-97. |
| 17. | Gendrault JL, Montecino-Rodriguez F, Cinqualbre J. Structure of the normal human liver sinusoid after perfusion fixation. Sinusoidal Liver Cells. Amsterdam: Elsevier/North-Holland Biomedical Press 1982; 93-100. |
| 18. | Wisse E, De Wilde A, De Zanger R. Perfusion fixation of human and rat liver tissue for light and electron microscopy: a review and assessment of existing methods with special emphasis on sinusoidal cells and microcirculation. Science of Biological Specimen Preparation. Chicago: SEM Inc 1984; 31-38. |
| 19. | Bullock GR. The currejnt status of fixation for electron microscopy: a review. J Microscopy. 1984;133:1-15. |
| 20. | White DL, Mazurkiewicz JE, Barrnett RJ. A chemical mechanism for tissue staining by osmium tetroxide-ferrocyanide mixtures. J Histochem Cytochem. 1979;27:1084-1091. |
| 21. | Hayat MA. Principles and techniques of electron microscopy: biological applications. Cambridge: Cambridge University Press 2000; . |
| 22. | Wisse E, De Zanger RB, Jacobs R, McCuskey RS. Scanning electron microscope observations on the structure of portal veins, sinusoids and central veins in rat liver. Scan Electron Microsc. 1983;1441-1452. |
| 23. | Wisse E, De Zanger RB, Charels K, Van Der Smissen P, McCuskey RS. The liver sieve: considerations concerning the structure and function of endothelial fenestrae, the sinusoidal wall and the space of Disse. Hepatology. 1985;5:683-692. |
| 24. | Boyde A, Wood C. Preparation of animal tissues for surface-scanning electron microscopy. J Microsc. 1969;90:221-249. |
| 25. | Nation JL. A new method using hexamethyldisilazane for preparation of soft insect tissues for scanning electron microscopy. Stain Technol. 1983;58:347-351. |
| 26. | Boyde A. Review of basic preparation techniques for biological scanning electron microscopy. Electron microscopy. The Hague: 7th Eur. Congress Electron Microsc Foundation Leiden 1980; 768-777. |
| 27. | Braet F, De Zanger R, Wisse E. Drying cells for SEM, AFM and TEM by hexamethyldisilazane: a study on hepatic endothelial cells. J Microsc. 1997;186:84-87. |
| 28. | Frenzel H, Kremer B, Richter IE, Hücker H. [The fine structure of liver sinusoids after perfusion fixation with various pressures. A transmission and scanning electron microscopic study (author's transl)]. Res Exp Med (Berl). 1976;168:229-241. |
| 29. | Fox CH, Johnson FB, Whiting J, Roller PP. Formaldehyde fixation. J Histochem Cytochem. 1985;33:845-853. |
| 30. | Davies B, Morris T. Physiological parameters in laboratory animals and humans. Pharm Res. 1993;10:1093-1095. |
| 31. | DeLeve LD. Hepatic microvasculature in liver injury. Semin Liver Dis. 2007;27:390-400. |
| 32. | Tanuma Y, Ohata M, Ito T. A transmission electron microscopic study of rabbit liver sinusoids with special remarks on an experimentally induced canalicular system and the "pored domes" in the endothelial cells. Arch Histol Jpn. 1987;50:177-192. |
| 33. | Braet F, Muller M, Vekemans K, Wisse E, Le Couteur DG. Antimycin A-induced defenestration in rat hepatic sinusoidal endothelial cells. Hepatology. 2003;38:394-402. |
| 34. | David H, Uerlings I. Quantitative ultrastructure of the rat liver by immersion and perfusion fixations. Exp Pathol. 1983;23:131-141. |
| 35. | Lievens J, Snoeys J, Vekemans K, Van Linthout S, de Zanger R, Collen D, Wisse E, De Geest B. The size of sinusoidal fenestrae is a critical determinant of hepatocyte transduction after adenoviral gene transfer. Gene Ther. 2004;11:1523-1531. |
| 36. | Snoeys J, Lievens J, Wisse E, Jacobs F, Duimel H, Collen D, Frederik P, De Geest B. Species differences in transgene DNA uptake in hepatocytes after adenoviral transfer correlate with the size of endothelial fenestrae. Gene Ther. 2007;14:604-612. |
| 37. | Arborgh B, Bell P, Brunk U, Collins VP. The osmotic effect of glutaraldehyde during fixation. A transmission electron microscopy, scanning electron microscopy and cytochemical study. J Ultrastruct Res. 1976;56:339-350. |
| 38. | Desmet VJ. The amazing universe of hepatic microstructure. Hepatology. 2009;50:333-344. |


