Published online Nov 18, 2015. doi: 10.5312/wjo.v6.i10.847
Peer-review started: March 31, 2015
First decision: April 27, 2015
Revised: May 7, 2015
Accepted: August 30, 2015
Article in press: August 31, 2015
Published online: November 18, 2015
Processing time: 228 Days and 6.4 Hours
Broken drill bits can be difficult to remove from the proximal femur and may necessitate additional surgical exploration or special instrumentation. We present a simple technique to remove a broken drill bit that does not require any special instrumentation and can be accomplished through the existing incision. This technique is useful for those cases where the length of the broken drill bit is greater than the diameter of the bone.
Core tip: Drill bits can break during locking in femoral intramedullary nailing. In this article, the authors describe an innovative yet simple technique to remove a broken drill bit from the proximal femur.
- Citation: Chouhan DK, Sharma S. “Push back” technique: A simple method to remove broken drill bit from the proximal femur. World J Orthop 2015; 6(10): 847-849
- URL: https://www.wjgnet.com/2218-5836/full/v6/i10/847.htm
- DOI: https://dx.doi.org/10.5312/wjo.v6.i10.847
Locked intramedullary nailing of the femur is widely used to treat fractures of the shaft of femur. Drill bit breakage is one of the most commonly encountered hardware breakage problems[1] and may occur during proximal or distal locking. The presence of muscle bulk and the femoral neurovascular bundle make drill bit retrieval from the proximal femur difficult. We present a simple method to remove a broken drill bit from the proximal locking hole.
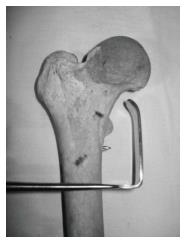
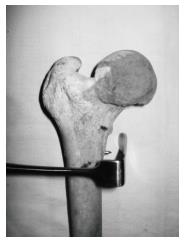
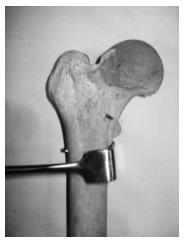
The stab incision for the proximal locking hole is extended by 2 cm both proximally and distally. Dissection proceeds down to the proximal femur after splitting the vastus lateralis muscle and the drill hole is identified. Maintaining a strictly sub-periosteal plane, the vastus intermedius and medialis origin is lifted subperiosteally and two curved Hohmann retractors are introduced to aid in retraction. Next, a right angled narrow blade Langenbeck retractor (10 mm blade width, 30 mm blade length) is inserted through the incision with its blade tip facing proximally. A retractor with a smaller blade (6 mm blade width, 20 mm blade length) may be used if the surgeon encounters difficulty in introducing the 10 mm × 30 mm blade retractor. Care is taken to ensure that the shaft of the retractor is flush with the anterior cortex of femur. The blade is advanced well beyond the medial cortex of femur and this is confirmed on the image intensifier in the antero-posterior view (Figure 1). Next, the blade is rotated by 90 degrees so that its blade tip faces posteriorly and the broken drill bit lies in the center of the retractor’s blade (Figure 2). Once the correct position has been verified on the image intensifier, the blade of the retractor is pushed towards the medial cortex of femur and on to the penetrating drill bit. This “pushes back” the drill bit into the drill hole and out through the lateral entry hole from where it can be retrieved under direct vision (Figure 3).
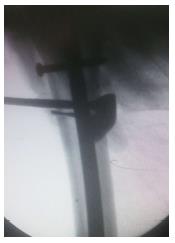
A 34-year-old male with mid - diaphyseal, comminuted shaft femur fracture was taken up for locked intramedullary nailing (Simplified Universal Nail, Synthes, Paoli). The drill bit broke while statically locking the screw hole. On image intensifier examination, it was found the broken end of the drill bit was protruding from the medial cortex of the femur. The drill bit was removed using the “push back” technique (Figure 4).
Broken drill bits protruding through the far cortex of a drill hole can be difficult to retrieve from the proximal femur. The usual method in other locations is to make an incision on the far side, dissect the soft tissues and retrieve the drill bit under direct vision or to push the bit out through the opposite side by inserting K wires[2] or new screws[3]. However, this method may be difficult to perform in the proximal femur as the large bulk of the adductor compartment necessitates a longer skin incision and a lot of soft tissue dissection. Also of concern is the femoral neurovascular bundle that courses within the adductor canal and may be inadvertently injured during dissection.
We believe that our method is a safe alternative to retrieve broken drill bits in such situations. It can be easily adapted for the distal femur as well. Also, it is important to use a narrow blade Langenbeck retractor since the iliopsoas tendon and the periosteum may make placements of larger retractors difficult. The only time this method would not work is when the length of the broken drill bit is quite small and it is retained entirely within the medullary canal of the proximal femur. In such cases, the surgeon may need to fish out the drill bit through a small cortical window in the lateral or the medial cortex. Alternatively, the technique described by Matthews et al[4] may be useful.
Fortunately, such occurrences are rare and in the authors’ experience, the broken drill bit is invariably longer than the diameter of the medullary canal.
To conclude, we believe that the “push back” technique may be an effective and safe alternative to retrieve broken drill bits from the proximal femur if the length of the drill bit is greater than the diameter of the femur and the method may be adapted to other sites as well.
A 34-year-old male presented with injury to right thigh after road traffic accident.
Fracture shaft of femur.
Comminuted mid-diaphyseal fracture of the femoral shaft.
Statically locked femoral intramedullary nailing (Simplified Universal Nail, Synthes).
Drill bit breakage is a frequent occurrence in orthopedic surgery and the surgeon must be prepared to handle it; the push-back technique can be a valuable alternative in some cases.
This case report paper presents an alternative technique for removing broken drill bits from the proximal (or distal) femur.
P- Reviewer: Franklyn MJ, Maheshwari AV S- Editor: Tian YL L- Editor: A E- Editor: Lu YJ
| 1. | Price MV, Molloy S, Solan MC, Sutton A, Ricketts DM. The rate of instrument breakage during orthopaedic procedures. Int Orthop. 2002;26:185-187. [RCA] [PubMed] [DOI] [Full Text] [Cited by in Crossref: 39] [Cited by in RCA: 39] [Article Influence: 1.7] [Reference Citation Analysis (0)] |
| 2. | Sancineto CF, Rubel IF, Seligson D, Ferro GV. Technique for removal of broken interlocking screws. J Orthop Trauma. 2001;15:132-134. [RCA] [PubMed] [DOI] [Full Text] [Cited by in Crossref: 21] [Cited by in RCA: 23] [Article Influence: 1.0] [Reference Citation Analysis (0)] |
| 3. | Davies NM, Farnell RD, Unwin AJ, Jones JR. A technique for removal of fractured locking screws from an intramedullary nail. Injury. 1997;28:159. [RCA] [PubMed] [DOI] [Full Text] [Cited by in Crossref: 10] [Cited by in RCA: 12] [Article Influence: 0.4] [Reference Citation Analysis (0)] |
| 4. | Matthews SJ, Landsmeer RE, Thomas TL. Removal of broken drill bits and locking screws from an intramedullary nail. Ann R Coll Surg Engl. 2006;88:316. [RCA] [PubMed] [DOI] [Full Text] [Cited by in RCA: 1] [Reference Citation Analysis (0)] |


